RabbitMQ is the most well known open source message merchant. RabbitMQ is a lightweight application accessible for the greater part of the famous working frameworks. RabbitMQ bolsters different informing conventions. RabbitMQ can be effortlessly sent in a disseminated and united setups to meet high-scale, high-accessibility necessities.
Step 1:- You need to add and update the RabbitMQ repostory by following the commands with root privileges.
sudo -i
echo ‘deb http://www.rabbitmq.com/debian/ testing main’ | tee /etc/apt/sources.list.d/rabbitmq.list
wget -O- https://www.rabbitmq.com/rabbitmq-release-signing-key.asc | apt-key add –
Step 2:- Update the ubuntu repostory and Install the RabbitMQ by using the following the commands.
apt-get update && apt-get install rabbitmq-server -y
Get the RabbitMQ service status by using the command.
systemctl status rabbitmq-server.service
You should get output like this:-
● rabbitmq-server.service – RabbitMQ broker
Loaded: loaded (/lib/systemd/system/rabbitmq-server.service; enabled; vendor
Active: active (running) since Sat 2020-02-29 15:52:35 IST; 2min 18s ago
Main PID: 3432 (beam.smp)
Status: “Initialized”
CGroup: /system.slice/rabbitmq-server.service
├─3432 /usr/lib/erlang/erts-7.3/bin/beam.smp -W w -A 64 -P 1048576 -t
├─3508 /usr/lib/erlang/erts-7.3/bin/epmd -daemon
├─3636 inet_gethost 4
└─3637 inet_gethost 4
Feb 29 15:52:32 aftab rabbitmq-server[3432]: RabbitMQ 3.6.15. Copy
Feb 29 15:52:32 aftab rabbitmq-server[3432]: ## ## Licensed under the MP
Feb 29 15:52:32 aftab rabbitmq-server[3432]: ## ##
Feb 29 15:52:32 aftab rabbitmq-server[3432]: ########## Logs: /var/log/rabbit
Feb 29 15:52:32 aftab rabbitmq-server[3432]: ###### ## /var/log/rabbit
Feb 29 15:52:32 aftab rabbitmq-server[3432]: ##########
Feb 29 15:52:32 aftab rabbitmq-server[3432]: Starting broker…
Feb 29 15:52:35 aftab rabbitmq-server[3432]: systemd unit for activation check:
Feb 29 15:52:35 aftab systemd[1]: Started RabbitMQ broker.
Feb 29 15:52:35 aftab rabbitmq-server[3432]: completed with 0 plugins.
By defaut Rabbit listen on given port number, default Data directory and log path .
Protocol Port
amqp 5672
clustering 25672
http 15672
home dir : /var/lib/rabbitmq
log : /var/log/rabbitmq/rabbit@aftab.log
sasl log : /var/log/rabbitmq/rabbit@aftab-sasl.log
database dir : /var/lib/rabbitmq/mnesia/rabbit@aftab
Step 3:- Controlling RabbitMQ Deamon
To start the Rabbit services use the following commands.
systemctl start rabbitmq-server
To get the status of the Rabbit services use the following commands.
systemctl status rabbitmq-server
To stop of the Rabbit services use the following commands.
systemctl stop rabbitmq-server
To start on boot time use the the following commands.
systemctl enable rabbitmq-server
To stop on boot time use the the following commands.
systemctl disable rabbitmq-server
Step 4: Create and set password of Admin Account on RabbitMQ, Use the following commands for that.
rabbitmqctl add_user administrator TYPE_PASSWORD_HERE
rabbitmqctl set_user_tags administrator administrator
rabbitmqctl set_permissions -p / administrator “.*” “.*” “.*”.
Step 5:- Enable RabbitMQ Web Management Web Console..
rabbitmq-plugins enable rabbitmq_management
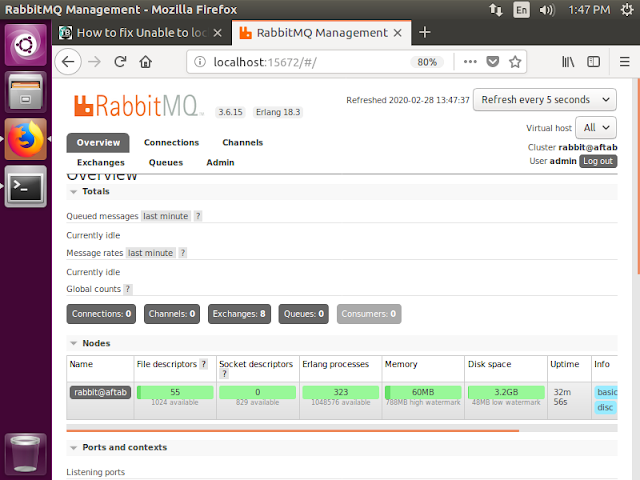
Stp 6:- Get access the RabbitMQ Web Admin Console use the following web url.
http://localhost_or_IP:15672
You should get the Login Web page on your browser use the credentials which We have created to access, by default RabbitMQ has a guest user
You can use the username – guest and password – guest
You need to delete the guest user after the Creation of Admin user on RabbitMQ.


wow
Thanks Dear…